

|


First let's talk software. All the sequencing is done in Xlights. This is FREE software that is constantly being updated by various developers around the world. You can download your copy here - https://xlights.org/releases/. I've been doing 2d rendering, one of these days I'll get the 3d rendering done.
Hardware - these are not free. I run falcon controllers exclusively. I use a combination of F16 and F48 boards.
Falcon - https://www.pixelcontroller.com/store/
An alternate that other folks use is Kulp - https://kulplights.com/product-category/controllers/
Pixels run off of either 12v or 5v DC power. You'll need power supplies to convert your AC to DC. I use meanwell power supplies - LRS-350-12. Be sure to get the correct power supply that matches your lights voltage (more on that below). When you get your power supply make sure you flip the input switch to 120v. I buy them in bulk from Arrow or Jameco, but lots of places sell them. You should be able to power about 600 pixels at 100% brightness from one power supply. I run the lights at 10% and toss on 1200 pixels with no problem. Just be sure to get enough power supplies for your layout. Some shows power their lights through the controllers, you can do that, but remember it'll be limited to two power supplies, and thus a very small number of lights. Since I knew I was going to power inject I just built everything around that. My power supplies are near the lights which means shorter cable runs and nothing to go back and fry my expensive controller boards.
I use fused power distrubution boards to get the power from the power supplies to the lights. It offers a level of protection and is easier to hook up. Each power supply gets it's own distribution block. I have a combination of these and these.
Let's talk lights. I use a combination of 12mm bullet pixels and 12mm square pixels. The arches and snowflakes use square pixels, everything else is bullets. I'd go with bullets if the prop didn't require squares. As mentioned above, they come in either 12v or 5v versions. I'm 12v exclusively. Pick one voltage and stick with it. The reason I chose 12v was to reduce the number of times I had to apply power. Figure you need to inject power every 100 pixels (@ 100% power) using 12v, with 5v it's ever 50 pixels (@ 100% power). Since I run much lower I inject every 300 pixels or so. And since the power runs both ways I inject at between pixel 300 and 301 and then again between pixel 900 and 901 (for example). Two injections feeding 1200 pixels. There's also resistor vs regulated pixels. I've only done resistor type.
Where do I get the lights? Certainly not at wal-mart or lowes. I've ordered directly from China for many years, only recently going with a US vendor (who has more buying power than lowly me). I've bought from Ray Wu & Paul Zhang directly from China. Always get a quote from them for what you want. Aliexpress will give exhorbitant quotes on shipping. If you want to try a US vendor, I've bought from RGBMan, never had an issue, but others have serious problems getting the lights. Other vendors that are popular are Wallys Lights, Wired Watts, ScottLED. The spacing between the lights is usually 3" - 4", but you can special order any spacing you want (take longer to get them). Other things to consider is quantity (typically 50 or 100 count strings, again, special order anything you want). Color - black and white are common, green is usually available or r/w/b wiring. And now for the important decision, what kind of ends do you want? How will the lights hook together? Just use xconnect ends for everything. I always used the 25 cents per pixel rule, but that might have gone up with shortage of chips.
Hardware - check, lights - check, software - check. Now what?
You'll be needing some pigtails (all the light vendors sell these too). These connect from the hardware to the light string. Also used to inject power. Light pigtails are 3 core (power, V+, gnd) pigtails, my power injection pigtails are two core (V+ and gnd). Buy enough, buy too many, can never have enough pigtails. I also use power Tees to inject power. I've used the 3-2-3 Tees with zero issues. End of one string attaches to one end, power connects in the middle and new string goes to the other end. For the pigtails and Tees you'll need to match up the correct ends (xconnect or whatever you choose).
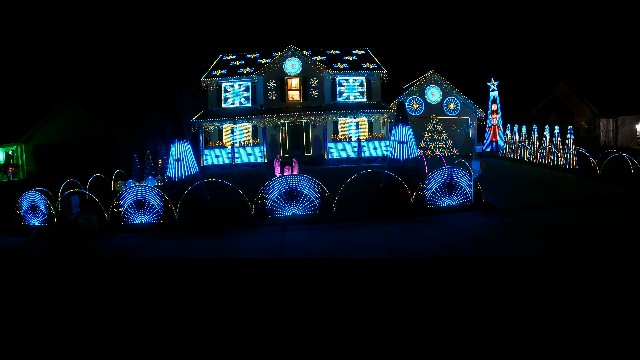
Props. What are props? Your typical house/drive thru display would typically have the lights throw up in some trees, tossed over a couple of bushes, maybe haphazardly put up on the roof lines. With the computer controlled lights, each pixel has a number, that pixel should be placed very exactingly on the house to match how you drew it up in the software. To help with this you have props. The snowflakes on the windows are props where the lights follow a specific pattern. The porch posts have props, the matrices on the porch panels are props, the trees all use prop materials, window/door frames are props. Do I need to buy all my props? Of course not. The spiral trees on the left are old, old, old incandescent spiral trees that I repurposed with pixels, same for the snowflakes on the roof. Where do I get my props? I've used Boscoyo Studios exclusively. But there's Gilbert Engineering too. You'll have to push each pixel into the prop hole. It's a tight fit and your fingers and thumb will hate you very quickly. See about buying pixel pliers if you plan on pushing into strips, you'll thank me. This is the type I use. Otherwise a lot of tape and good gloves will be your friend. Just sit down, watch some TV and push some pixels.
Your controllers and power supplies won't be near your lights so you'll need to somehow get the information from the controller to the lights and power from the power supplies to your lights. I've used cat5 cable for all of this. For data cables I create a ground and data wire (blue, blue/white, green, green/white for ground, orange for data, chop off the others). For power cables (blue, blue/white, green, green/white for ground, orange, orange/white, brown, brown/white for V+). This starts the DIY portion. Need to strip the wire, tin them and solder them to the corresponding pigtail. I just rough measure the distance between where the lights are going to be and where I'm going to have the controller, pull out the cat5, add a little extra and get busy soldering. To waterproof those connections you'll need a supply of shrink tube. I recommend getting a 3:1 dual wall type tube. 1/8" for the small wires and then 3/8" to put over the whole cable. The dual wall has a lining of hot glue so it really seals it up good. Ebay has been my friend for shrink tube. I buy spools of 100 feet. Other people swear by solder sleeves/tubes/seals (not sure what size to get though if you go that route). If you want to use cat5 cable be sure to get stranded wire (not solid) and has to be 100% copper, none of that CCA stuff. I've had good luck getting it from Monoprice. I buy a few thousand feet at a time though (white and black are my go to colors)
What else do I need? I run the show from the computer via network cables out to the control boards. You'll need some of these cables (or make your own with the CAT5 cable you just bought). Do I have to do that? Nope. You can grab yourself a rasperry PI and download the Falcon Player (FPP) software onto it and let it run the show for you. Haven't bothered with that, but may look into it one of these days.
Getting closer. You'll need some extension cords to power all those power supplies. You can daisy chain the power supplies together off of one extension cord feed. I max out at 4 power supplies for one extension cord. You should also consider getting some kind of box to store your stuff. I use a combination of cableguard cg-1500 boxes and some water tight tool boxes (with a rubber seal on the seal) for anything that's exposed to the weather. Or just some cheap-o rubbermaid boxes for items not exposed to the elements (sitting the garage). I've seen some pictures of these gorgeous box builds that people spend months on (only have to the most boring sequencing imaginable). I just toss everything the box and spend my time on sequencing.
But how does everyone hear the music? For that you'll need an FM transmitter. I use the signstek fm transmitter. Easy to dial in your frequency. But I started out with a Ramsey FM25B transmitter, worked fine, probably still works fine, but not the easiest to change signals. Just be sure to find a nice blank radio station - use this to help - https://radio-locator.com/cgi-bin/vacant
What else might I need?
Network tester
Wire stripper
Network cable crimper
Zip ties (monoprice if you're already ordering cat5).
3rd hand, octopus gizmo for soldering - like this
Now that you have everything let's make this thing dance. Oh crap, you still need to sequence all those lights to do something. This takes time, a lot of time, a lot lotta time. I usually spend 40-80 hours programming a song. You've come this far doing all of this yourself, take some pride in sequencing some music yourself. Or take the easy way out and just use what's free out there (in xlights, go to tools, download sequences/lyrics) or try the xlights google drive (if there's a password, it's xlights). Or shell out some dough and buy your sequences, some reasonably priced vendors are RGBSequences or ShowStopperSequences
Last updated on
12/02/2025